
Documentation
EVENT LINK
Event Link Application: User Guide
1. Introduction
Welcome to Event Link! This guide will walk you through the features and functionalities of the application.
Event Link is designed to simplify the process of creating and managing events. Its primary function is to generate an “Add to Calendar” widget that you can embed in confirmation emails, allowing your attendees to easily add your event to their personal calendars.
2. The Dashboard
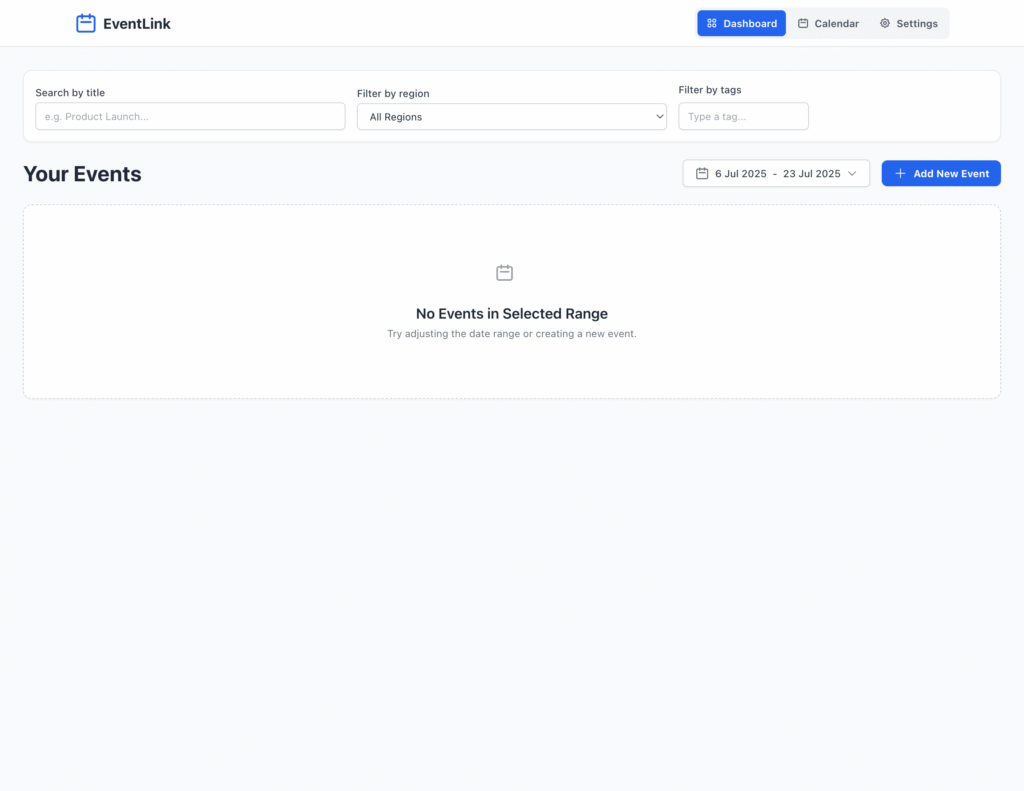
When you first open the Event Link, you’ll land on the Dashboard. This is your main hub for viewing and managing all your events.
Key Features of the Dashboard:
- Navigation: At the top right, you can easily switch between the Dashboard, Calendar, and Settings views.
- Filtering: You can find specific events using the filter bar:
- Search by title: Look for an event by its name.
- Filter by region: Narrow down events based on the region you’ve assigned them to.
- Filter by tags: Find events by the tags you’ve added.
- Date Range: Select a specific date range to view events scheduled within that period.
- Add New Event: The prominent “Add New Event” button takes you to the event creation form.
- Timeline View: Your events are displayed chronologically, grouped by date. Each event card shows key details like its region, title, time, duration, description, and tags. You can directly Edit or Delete an event from its card.
3. Creating and Editing an Event
Clicking “Add New Event” on the Dashboard or an existing event’s “Edit” button will take you to the event form.
Here is a detailed breakdown of each section:
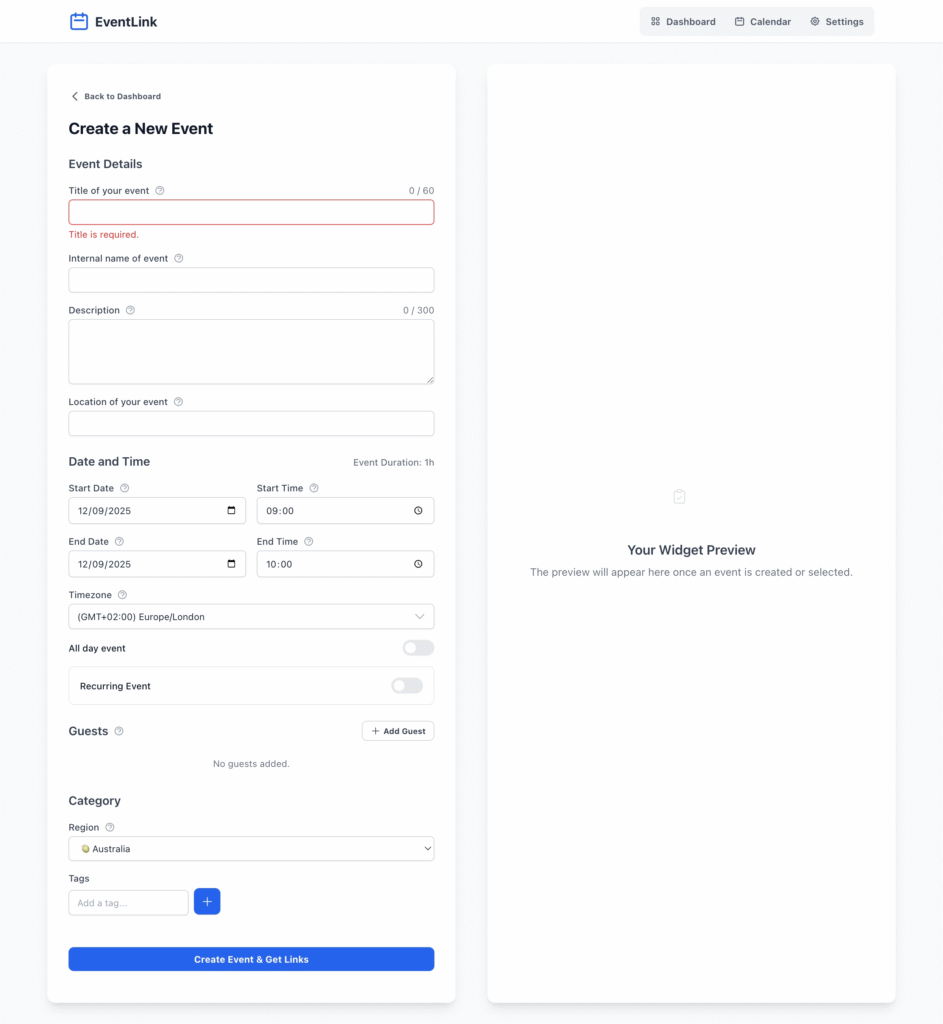
3.1 Event Details
- Title of your event: This is the public name of your event that attendees will see in their calendar invitation.
- Internal name of event: A private name for your internal reference only. It is not shown to attendees.
- Description: Provide a summary of your event. You can include details like an agenda, speaker information, or relevant links. This content will appear in the calendar invitation.
- Location of your event: Enter the physical address or the virtual meeting link (e.g., Zoom, Google Meet).
3.2 Date and Time
- Start/End Date & Time: Set the precise start and end times for your event. The form automatically calculates and displays the total Event Duration.
- Timezone: Select the timezone in which the event will take place. Event Link will automatically adjust the times for attendees based on their own calendar’s settings.
- All day event: Toggle this on if your event lasts the entire day. This will remove the start and end time fields.
- Recurring Event: If the event repeats, you can set a recurrence rule (e.g., weekly, monthly).
3.3 Guests
- Add Guest: Click this button to add attendees. Their email addresses will be included in the calendar invitation data, allowing calendar services to send them an invite directly.
3.4 Category
- Region: Assign the event to a region. This helps in organizing and filtering events on the Dashboard and Calendar views.
- Tags: Add relevant keywords (e.g., ‘Marketing’, ‘Webinar’, ‘Product Launch’) to your event. Tags are crucial for filtering and quickly finding events later.
3.5 Saving
Once all details are filled in, click the Create Event & Get Links button to save the event and generate the calendar links and widget. If you are editing, this button will say Save Changes.
4. Widget Preview and Links
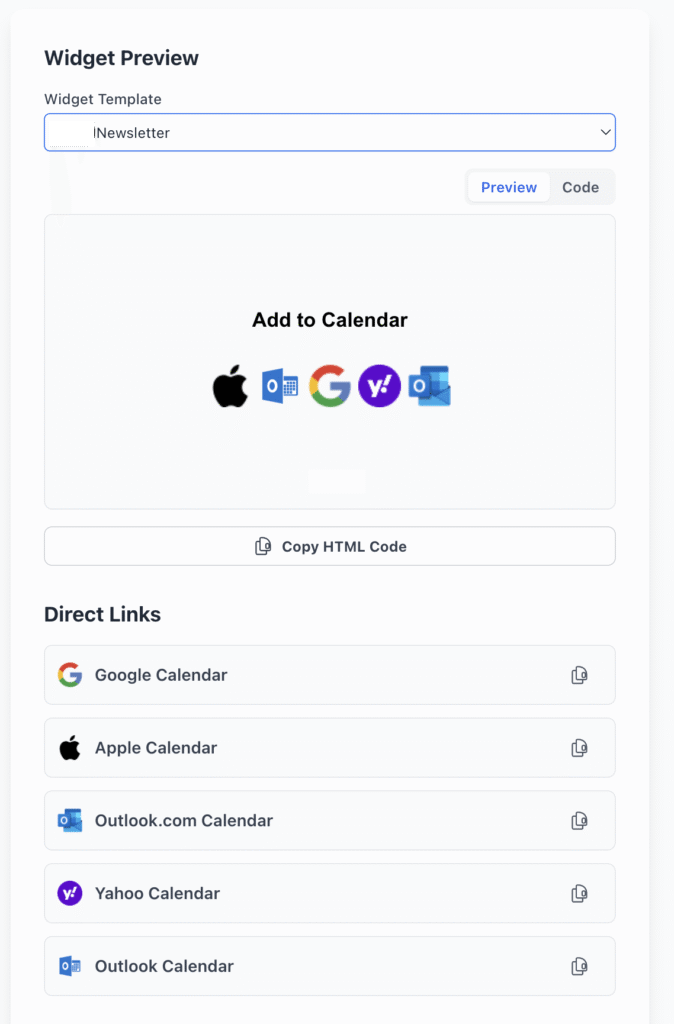
After creating or saving an event, the right-hand panel becomes active.
- Widget Preview: This section shows you exactly what your “Add to Calendar” widget will look like when embedded in an email.
- Direct Links: Event Link provides direct “add to calendar” links for various services, including Google, Apple, Outlook.com, and Yahoo.
- Copy HTML Code: Use this button to copy the widget’s HTML code for easy pasting into your email templates.
5. Calendar View
The Calendar view offers a traditional monthly, weekly, or daily grid to visualize your events. You can use the same search and filter controls as the Dashboard to narrow down the displayed events. Clicking on an event in the calendar will open its details for editing.
6. Application Settings
The Settings area allows you to customize and manage the data used throughout the application.
- Tags: Create, edit, and delete the tags used for categorizing events. You can assign specific colors to each tag for better visual organization.
- Widget Templates: Customize the HTML templates for your “Add to Calendar” widgets.
- Regions: Manage the list of regions (e.g., US, UK, Global) used for organizing events. You can assign a unique color and icon to each region.
- Contacts: Maintain a list of contacts (guests) so you can quickly add them to new events without re-typing their details.
- Locations: Save frequently used event locations for quick access in the event form.