
Documentation
PROMPT HUB
PROMPT HUB: User Guide
Welcome to Prompt Hub!
Welcome to your central workspace for creating, managing, and executing powerful AI prompts. Prompt Hub is designed for teams and individuals who want to streamline their creative and technical workflows by leveraging reusable, brand-aware prompt templates.
This guide will walk you through every feature of the application, from running a simple prompt to building complex, multi-step workflows.
The Main Interface
When you open Prompt Hub, you’ll see two main areas:
- The Sidebar (Left): This is your main navigation panel. From here, you can access all the core sections of the app: Prompt Runner, Prompt Library, Flows, Integrations, Brands, Tags, and the Analytics Dashboard. You can collapse it to save space or switch between light and dark modes using the controls at the bottom.
- The Main Content Area (Right): This is where the magic happens! This area will change depending on which section you’ve selected from the sidebar, displaying the tools and information you need.
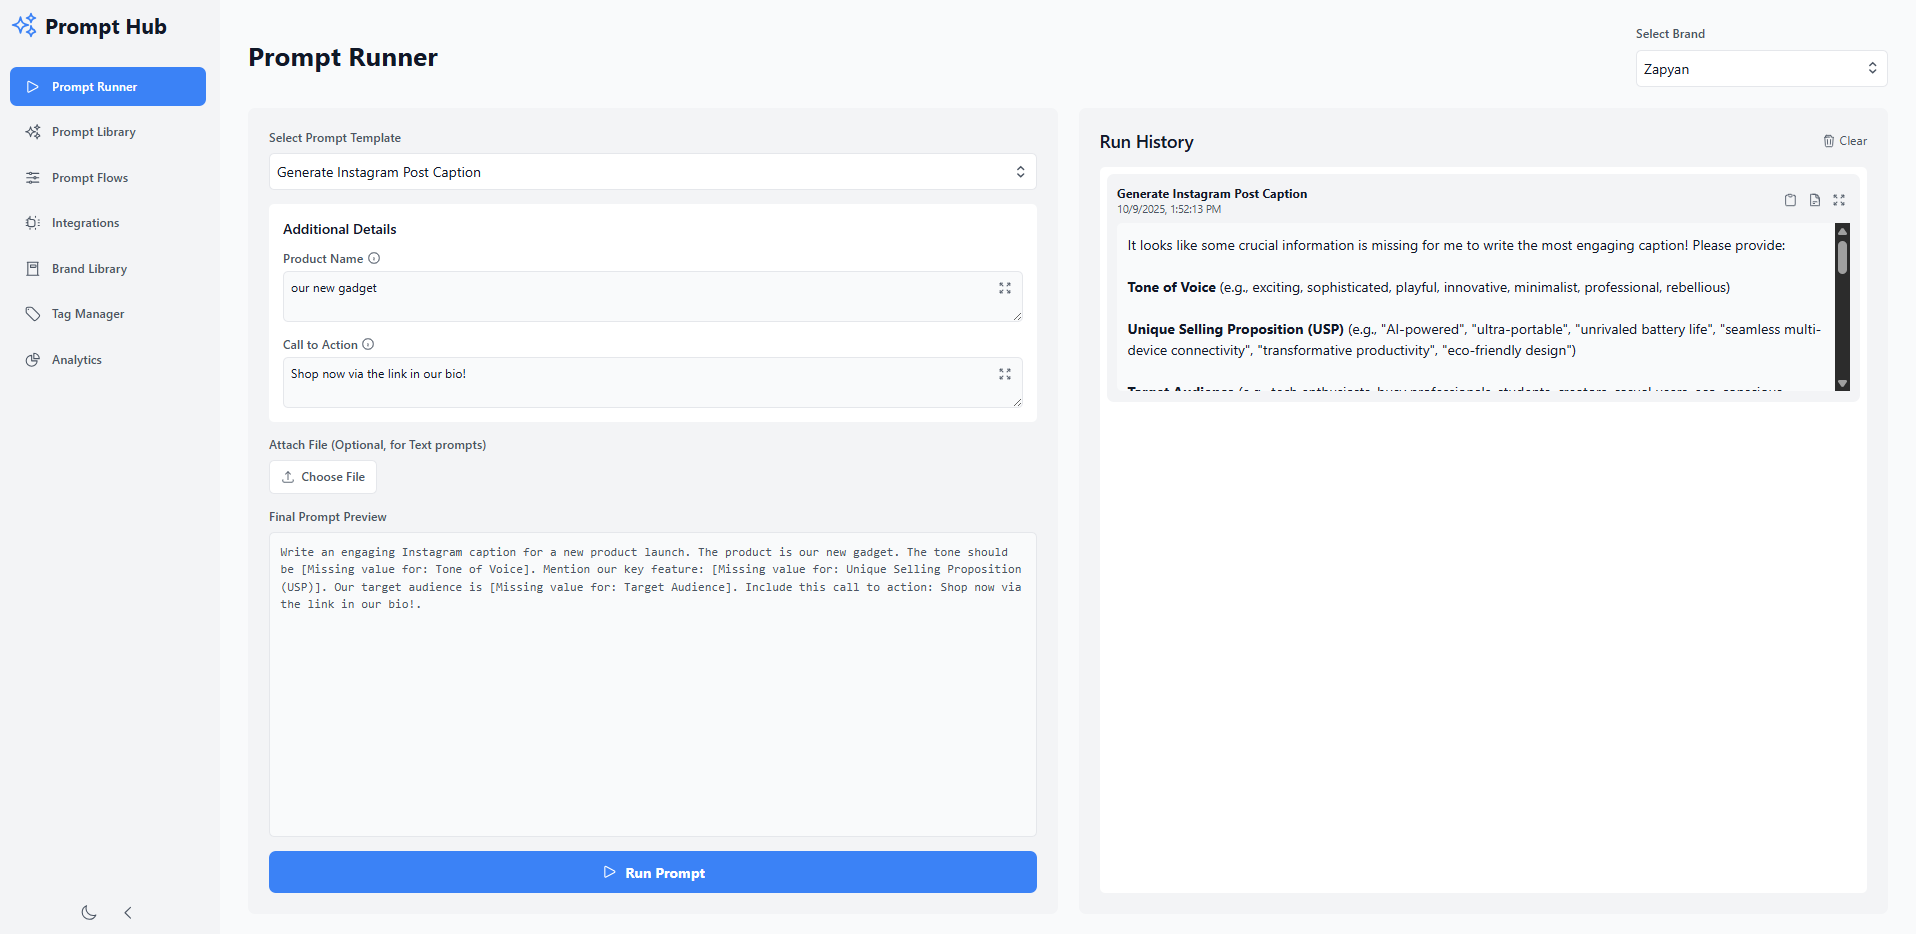
1. Prompt Runner
The Prompt Runner is where you bring your templates to life. It’s designed for the quick execution of prompts using your pre-defined brand data to generate content, images, or videos on the fly.
How to Use the Prompt Runner:
- Select a Brand: Use the “Select Brand” dropdown at the top-right. The brand you choose will automatically inject its specific attributes (like ‘Tone of Voice’ or ‘Target Audience’) into any prompt that uses them.
- Select a Prompt Template: Choose from your library using the “Select Prompt Template” dropdown. The prompt’s content and any specific variables will load in the left panel.
- Fill in Additional Details: If the prompt has custom variables (e.g.,
{{Product Name}}), input fields will appear. Fill these out to customize the prompt for this specific run. Hover over the info icon next to a variable name to see any helpful hints. - Attach a File (Optional): For text prompts that can analyze an image or video, you can attach a file using the “Choose File” button. This is useful for prompts like “Write a caption for this image.”
- Preview the Final Prompt: The “Final Prompt Preview” box shows you exactly what will be sent to the AI, with all brand attributes and variables filled in. This is a great way to double-check your work before running.
- Run the Prompt: Click the big “Run Prompt” button. The button will show a loading state while the AI processes your request.
- View the Output: The result will appear at the top of the “Run History” panel on the right.
- Text: Formatted text will be displayed. You can copy the raw text or copy it with formatting (for pasting into rich text editors).
- Image/Video: The generated media will be displayed.
- Manage History:
- Maximize: Click the maximize icon to view any output in a larger pop-up modal.
- Download: For images and videos, a download icon will appear, allowing you to save the file.
- Clear History: You can clear all previous runs using the “Clear” button at the top of the history panel.
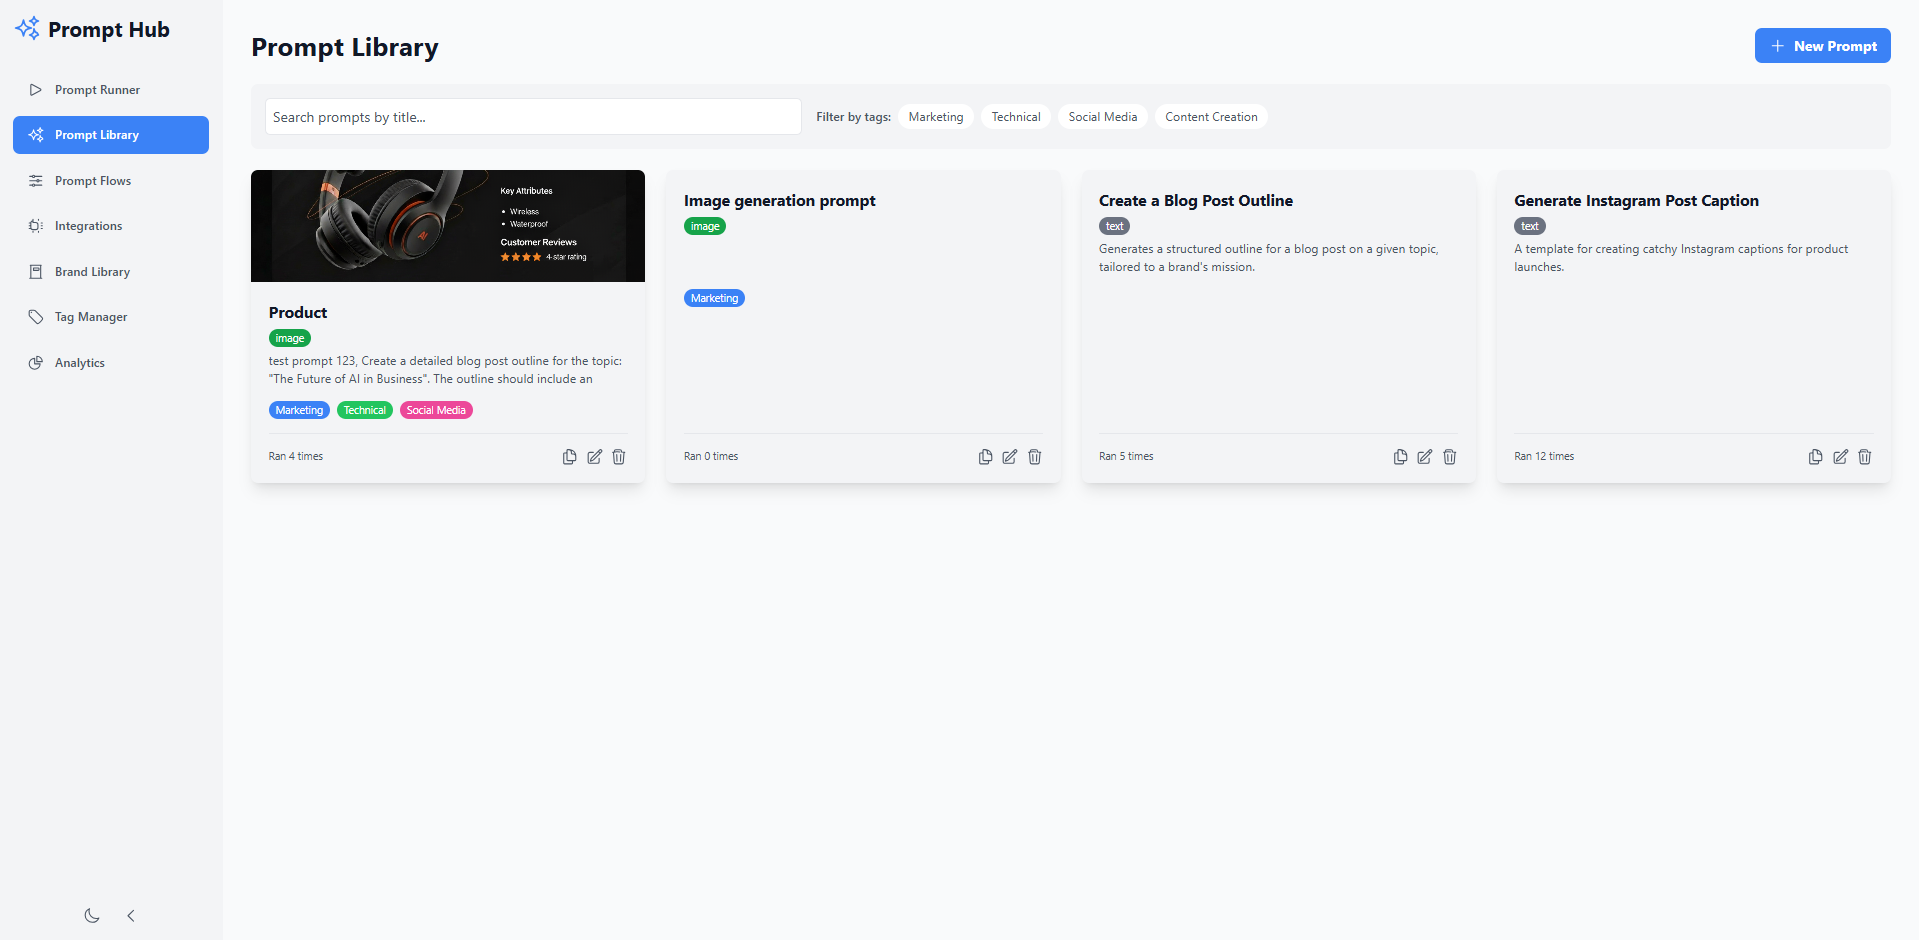
2. Prompt Library
The Prompt Library is the heart of your workspace. Here you can create, organize, and manage all the prompt templates your team uses.
How to Use the Prompt Library:
- Create a New Prompt: Click the “+ New Prompt” button to open the Prompt Editor.
- Search and Filter: Use the search bar to find prompts by title or click on tags to filter the view.
- Edit, Clone, or Delete: Use the icons at the bottom of each prompt card to manage your templates. Cloning is a great way to create a variation of an existing prompt without starting from scratch.
The Prompt Editor
When you create or edit a prompt, you’ll use the powerful Prompt Editor:
- Title, Description, Output Type: Define the prompt’s purpose and what kind of output it should generate (Text, Image, or Video).
- Featured Image: Upload an image to represent your prompt on its card in the library.
- Content: Write the body of your prompt. Use
{{variable_name}}syntax to insert placeholders. You can use the “Insert Variable” dropdown to easily add brand attributes or custom variables. - Tags: Assign tags to keep your library organized.
- Local Variables: Define any custom variables specific to this prompt (e.g.,
{{Product Name}}). You can provide a default value and a helpful hint that will appear in the Prompt Runner. - Preview & Run: The right-hand panel lets you test your prompt instantly. Select a brand, fill in any local variables, and click “Test Run” to see the output without leaving the editor.
- History: Click the “History” tab to view all saved versions of the prompt. You can see who made changes and when, and you can restore any previous version with a single click.
3. Brand Library
The Brand Library is where you store the unique identity and voice of each brand you work with. This data can be dynamically injected into any prompt, ensuring all AI-generated content is perfectly on-brand.
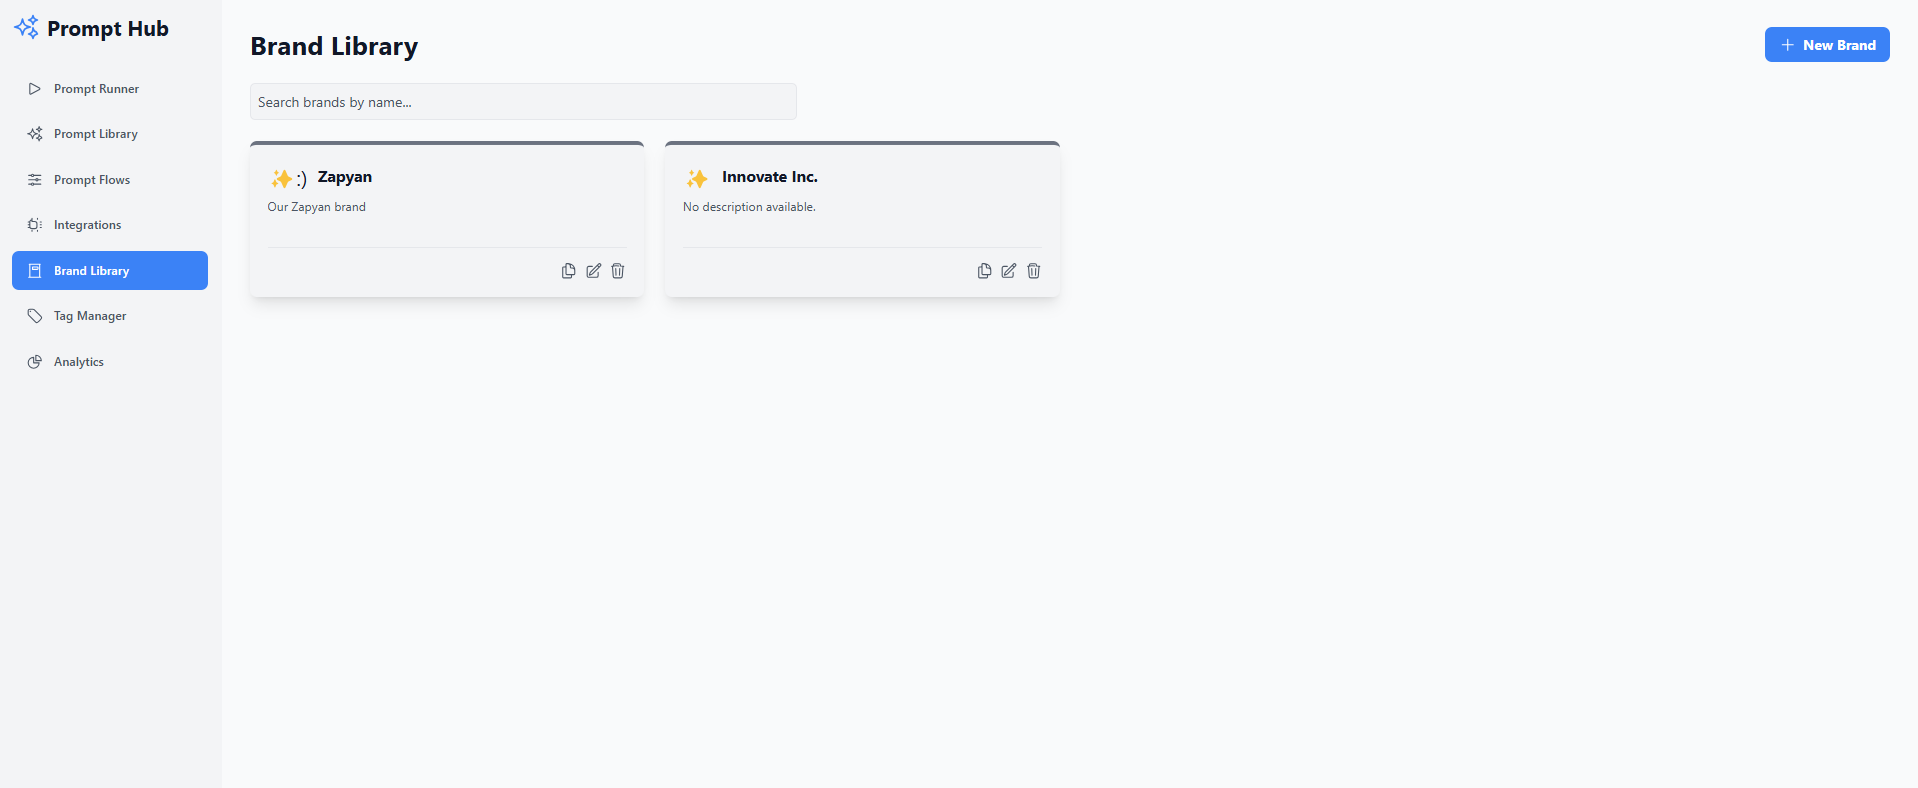
How to Use the Brand Library:
- Create a New Brand: Click “+ New Brand” to open the Brand Editor.
- Configure Brand Attributes:
- Standard Attributes: Fill in core brand information like ‘Tone of Voice’, ‘Target Audience’, and ‘Unique Selling Proposition’. These are available to all prompts.
- Custom Attributes: Add any other key-value data unique to this brand (e.g., ‘CEO Name’, ‘Slogan’).
- Use in Prompts: Once saved, you can select this brand in the Prompt Runner or the Prompt Editor’s test panel. Any prompt using
{{Tone of Voice}}will automatically pull the data from the selected brand’s profile.
4. Prompt Flows
Go beyond single prompts. Prompt Flows allow you to chain multiple prompts and API calls together to create powerful, automated workflows. For example, a flow could take a topic, generate a blog post outline (Step 1), write the full article based on that outline (Step 2), and then post it to your CMS via an API call (Step 3).
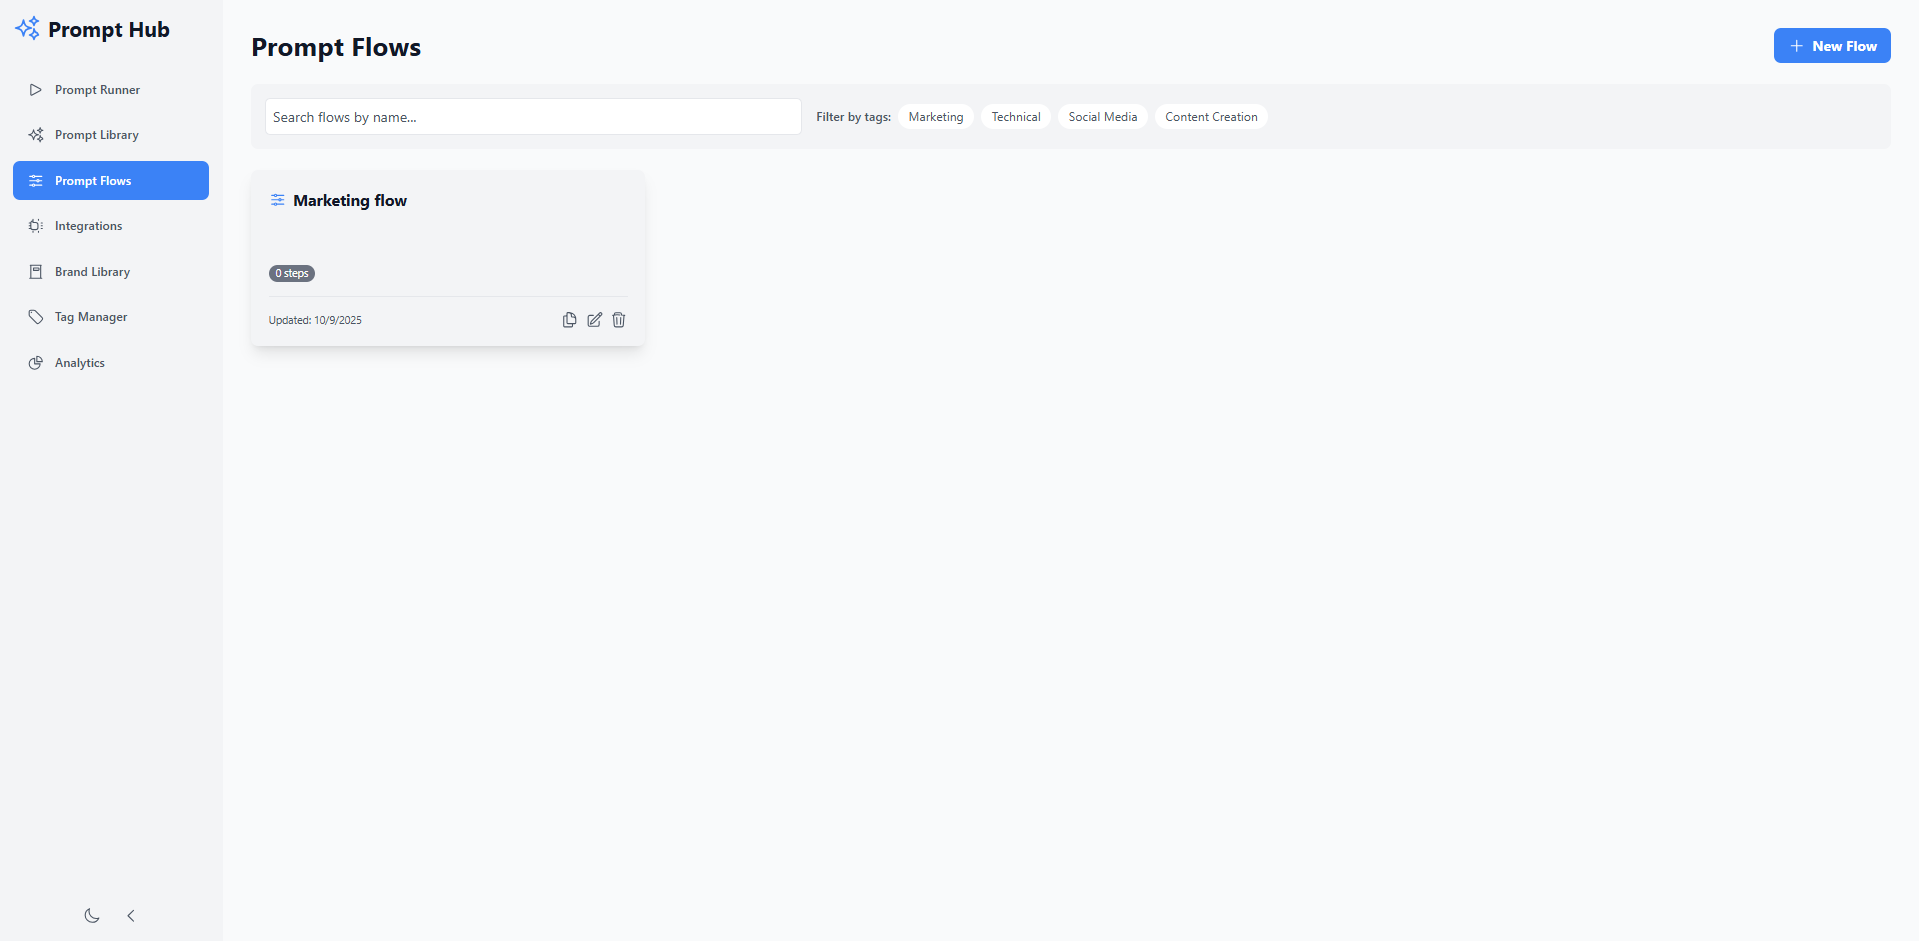
How to Use Prompt Flows:
- Create a New Flow: From the Prompt Flows page, click “+ New Flow”.
- Add Steps: In the editor, use the left panel to add steps. You can choose from any template in your Prompt Library or any API in your Integrations Library.
- Configure Each Step:
- Steps are added sequentially. You can reorder them using the up/down arrows.
- Variable Mapping: This is the key to flows. For each variable in a step, you can choose to:
- Use a global value (set when you run the flow).
- Use the output from any previous step.
- Set a custom, static value for this step only.
- Run the Flow:
- In the right-hand “Setup” panel, select a Brand Context for the entire flow.
- Fill in any “Global Variables” that are needed by your steps but aren’t mapped from other outputs.
- Click “Run”.
- Monitor Output: Switch to the “Output” tab to see the results of each step as they complete. You can also view a detailed execution “Log” in the third tab.
5. Integrations Library
Connect Prompt Hub to the outside world. The Integrations Library allows you to define connections to external APIs, which you can then use as steps within your Prompt Flows.
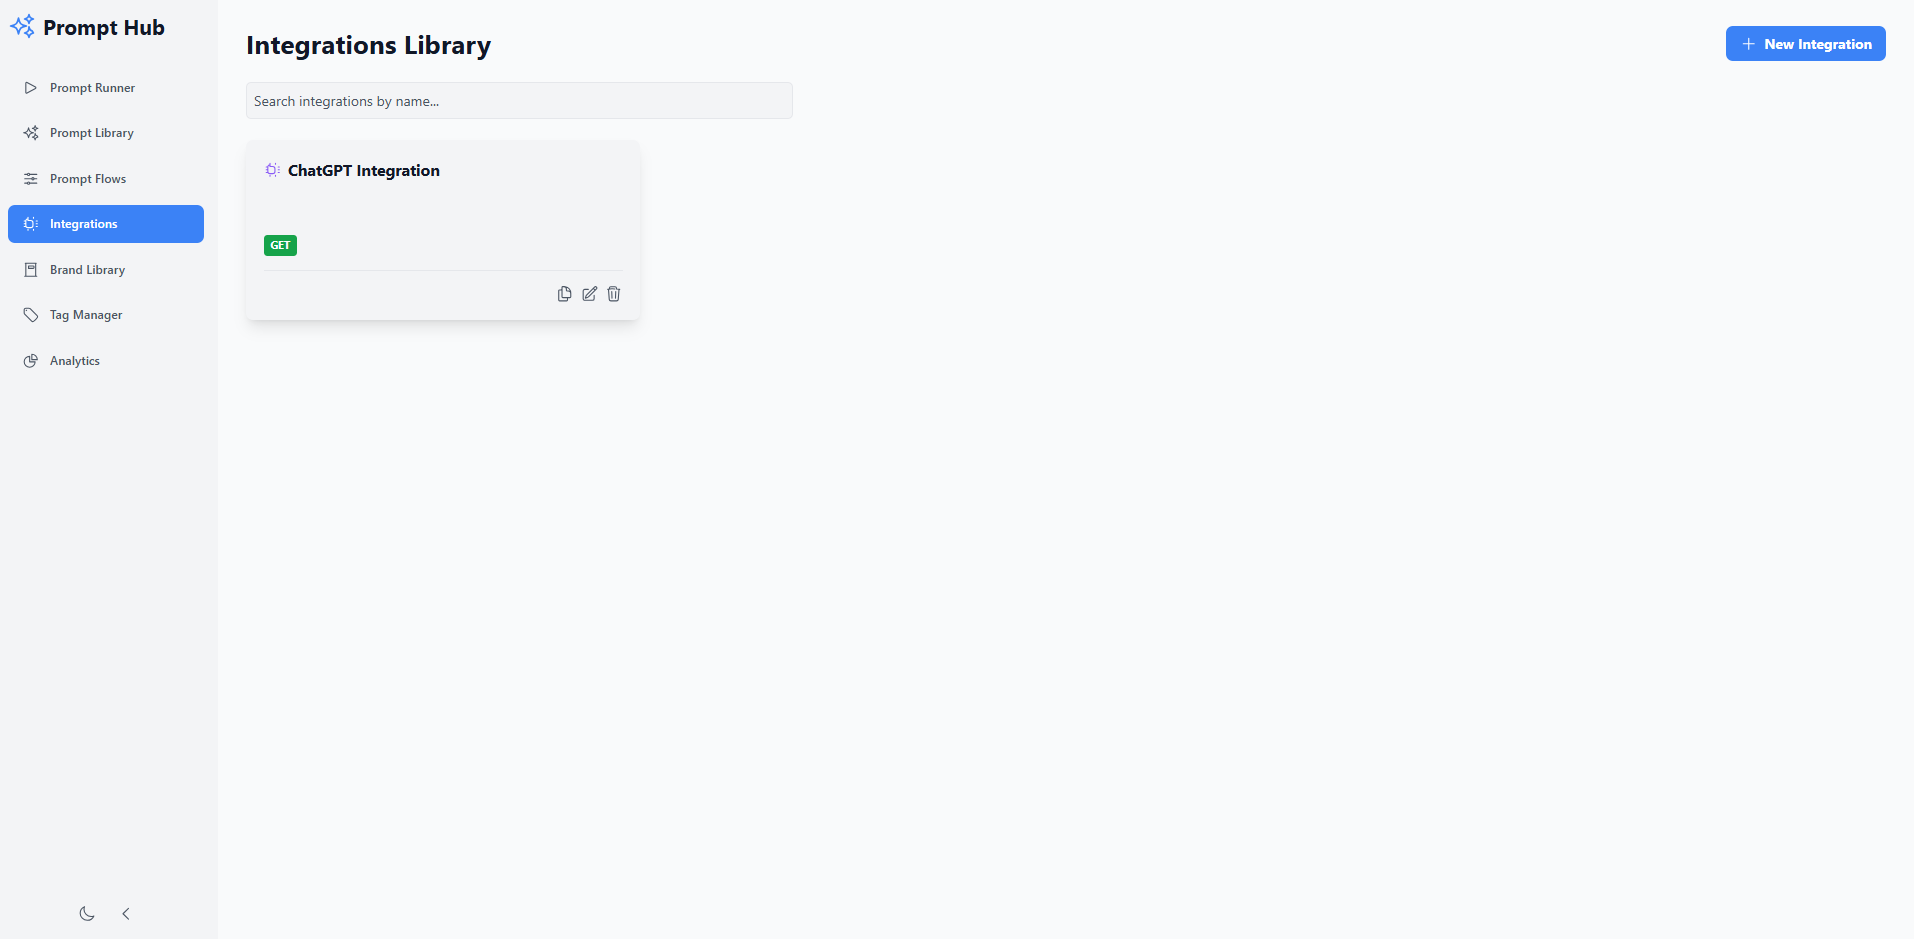
How to Use Integrations:
- Create a New Integration: Click “+ New Integration”.
- Configure the API:
- Method & URL: Set the HTTP method (GET, POST, etc.) and the API endpoint URL. You can use
{{variables}}in the URL. - Headers & Body: Define any required headers and, for POST/PUT requests, a JSON body template. Variables are also supported here.
- Variables: Define any variables used in the URL, headers, or body. These will become configurable fields when you use this integration in a Prompt Flow.
- Method & URL: Set the HTTP method (GET, POST, etc.) and the API endpoint URL. You can use
- Test Runner: Use the built-in test runner to send a request to your configured API and see the response directly in the editor, ensuring your setup is correct before you save.
6. Tag Manager
Keep your workspace tidy. Tags help you categorize and filter your Prompts, Flows, and Integrations.
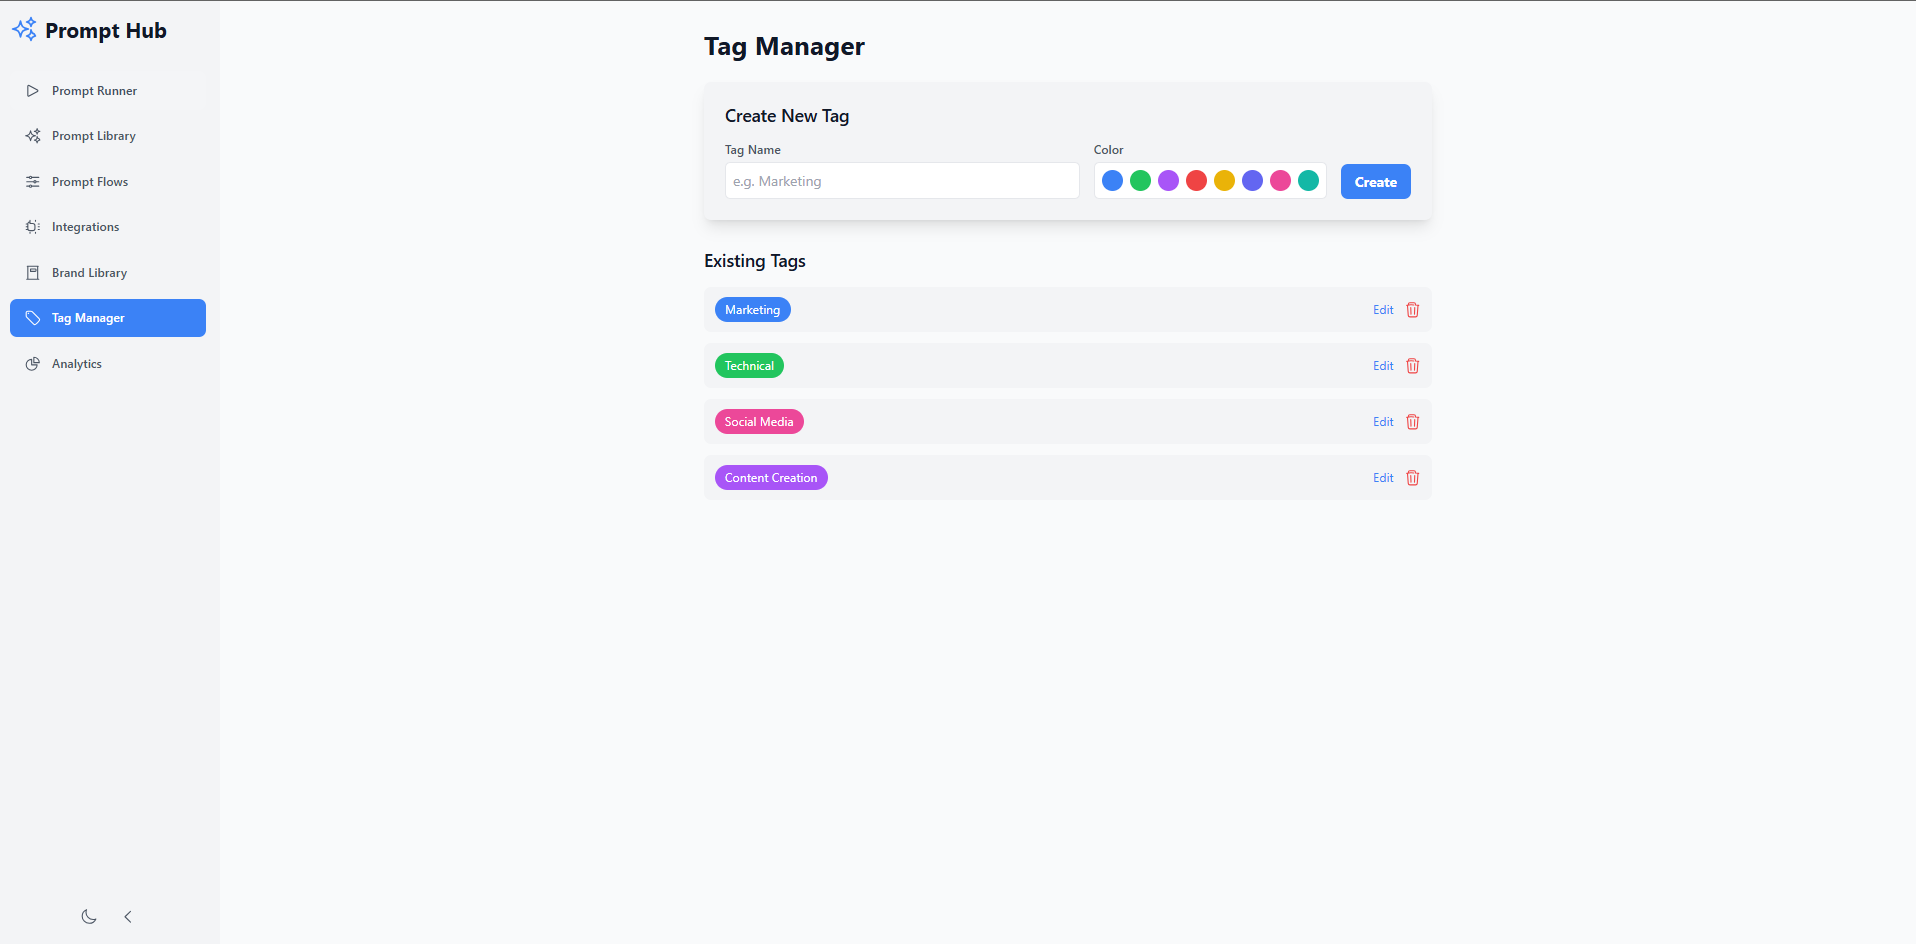
How to Use the Tag Manager:
- Create a Tag: Enter a name, pick a color, and click “Create”.
- Edit a Tag: Click the “Edit” button next to any tag to update its name or color.
- Delete a Tag: Click the trash icon to remove a tag.
- Assigning Tags: You can assign your created tags inside the editors for Prompts, Flows, and Integrations.
7. Analytics Dashboard
Get insights into how your prompts are being used. The dashboard provides a high-level overview of your team’s activity.
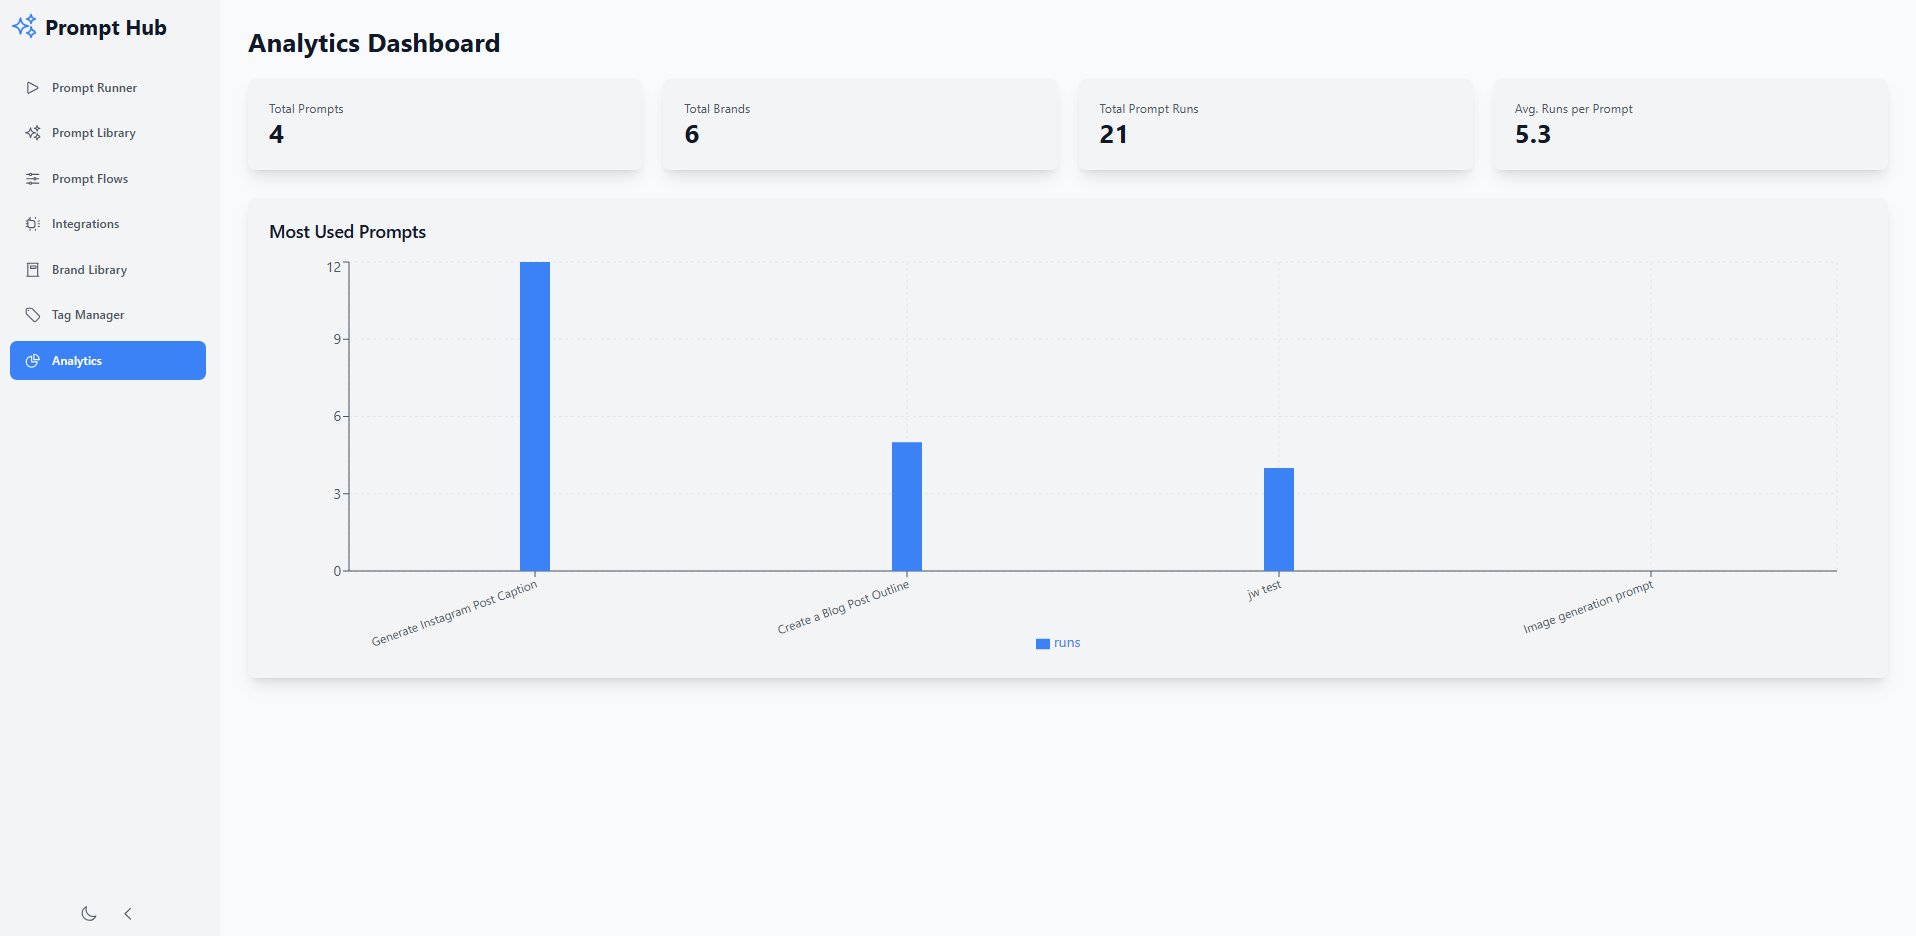
What You Can See:
- Key Metrics: At-a-glance cards show you the total number of prompts, brands, and prompt runs across your entire library.
- Most Used Prompts: A bar chart quickly identifies your most popular and effective prompt templates, helping you understand what’s working best for your team.